Phone: +86 736 6666811
Email: digitizing@lovedigitizing.com info@lovedigitizing.com

Establishing Guidelines
The ideal solution is to leave the connecting threads in place, though it’s not always possible. In order to do this, the letters need to be connected at the point where the distance between them is the least. But even then, the gap may be too wide. Any space greater than 1mm is usually too large if you are planning on leaving the connecting threads in place. With this in mind, you can establish the following embroidery digitizing parameter: letter connections greater than 1mm will need to be trimmed.
Establishing such a guideline will help you apply the necessary tactics to support the situation. In the examples pictured, you will see the word stitches. It was setup using a block font and a letter height of 2.54cm (1 inch).
If you zoom in and measure the closest point distance between the “s” and “t” the result will be about 2.2mm. (In fact, for every letter in the word, the closest point distance is in the same range.) Since this exceeds the (suggested) maximum connecting stitch length of 1mm, it will be necessary to trim the connecting stitches. Knowing this, you will have to ensure that the trimming process doesn’t cause any of the threads to come loose or unravel. Thus, it will be necessary to place a lock stitch immediately prior to each trim. Most software systems provide a tool that will place and create the lock stitch for you. If you have to create it manually, you can do so.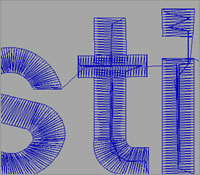
Here is one commonly used style of lockstitch, though some digitizers prefer to reduce the 3mm leg to 2mm.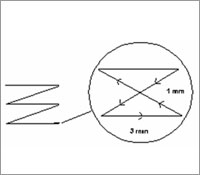
NOTE: Lock stitch styles and use are the subject of great debates amongst digitizers. There are many options and alternatives that can be used successfully.
Copyright (C)2002 - 2016,Love Embroidery Digitizing, All rights reserved.